
The Photographer’s Guide to Erawan Waterfalls, Kanchanaburi
InWanderment contains affiliate links. If you make a purchase or a booking using these links, we may receive a commission at no extra cost to you. This helps with the cost of running InWanderment. See our Privacy Policy page for more information. We appreciate your support!
Erawan Waterfalls is one of the most popular attractions in Kanchanaburi and one of the most beautiful waterfalls in Thailand.
But if you’ve been doing your research, you’ve probably heard the same thing we did: it’s too touristy, too crowded and not worth the effort.
Honestly, we nearly skipped it.
Everyone seemed to say it was overrated and impossible to enjoy, especially if you actually wanted to take photos.
But we decided to go anyway.
We’re so glad we didn’t miss one of the most photogenic spots in Thailand, despite what everyone says
Yes, it’s busy. Yes, it’s touristy.
But with the right timing and a bit of planning, it’s absolutely possible to enjoy it and get some beautiful, peaceful images.
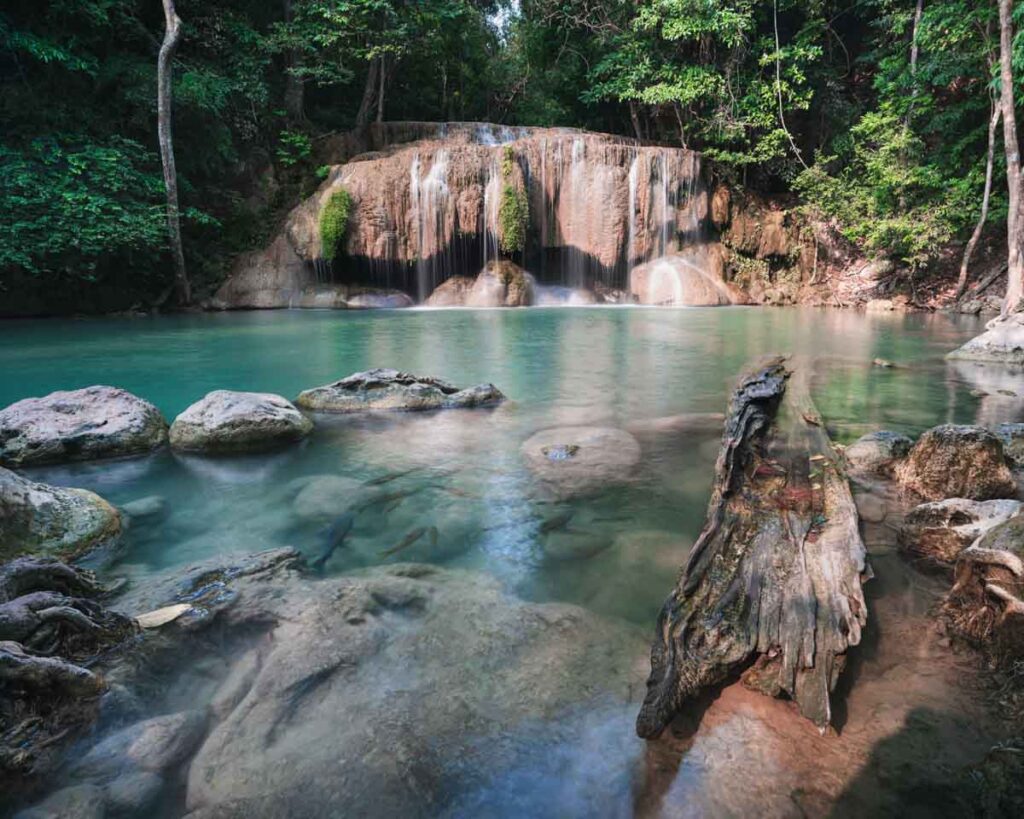
We ended up taking some of our favourite shots from our time in Kanchanaburi in Thailand and the jungle setting and clear blue water really does have something magical about it.
In this guide, we’ll walk you through what to expect at Erawan Waterfall, what to photograph and all the little things we wish we’d known before visiting. Whether you’re wondering how steep the trail is, which tiers are best for photography, or what gear to pack, we’ve got you covered.
We’ll also share the exact camera gear we used to get those epic shots (spoiler: a lightweight tripod made all the difference
If you’re looking for genuinely helpful tips (not just “go early and wear trainers”), this is for you.
📌Quick Guide to Erawan Waterfall in Kanchanaburi
📍 Location: Erawan National Park, Kanchanaburi, Thailand
🕗 Opening Hours: 8am–4.30pm (daily)
🎟️ Entrance Fee: 300 THB for foreigners ( £6.60 / $8.10), 20 THB (£0.45 / $0.55) for Thai nationals – cash only
🚗 Car Park Fee: 30 THB (£0.65 / $0.80)
💸 Life Jacket Rental: 20 THB (£0.45 / $0.55) per person – required if you want to swim
🥾 Hike Length: Approx. 2 km one way
⛰️ Elevation Gain: Gradual incline, gets steeper after Tier 4
💦 Swimming: Allowed in most tiers (life jackets required)
📸 Best For: Long exposure shots, waterfall photography and reflections
📅 Best Time to Visit: November to February
🧭 Difficulty Level: Moderate – manageable but gets sweaty in parts

💡 Planning a trip but not sure where to start? 🤔
👉 Grab your FREE Guide to 50+ of the BEST travel apps – Apps to help you navigate, find volunteer roles, house swapping, transport, planning, and more!
✈️ As full-time travel photographers, we’ve personally tested and used every app in this guide during our 18 months on the road, and they honestly made travel smoother, smarter, and way more fun.
📩Pop in your email and we’ll send it straight over – hope it helps make your next adventure a little easier!
What is Erawan waterfalls?
Erawan Waterfalls is one of the most popular natural attractions in Kanchanaburi.
Located inside Erawan National Park, one of the most stunning national parks in Thailand and about an hour’s drive from Kanchanaburi town, the falls stretch across seven beautiful tiers, each with its own turquoise pool and jungle backdrop.
It has tons to offer if you’re a photographer and nature lover, from hiking, swimming, waterfall photography, and wildlife spotting and it’s perfect whether you’re here for a relaxed paddle or want to shoot silky long exposures of the cascades. The water is naturally bright blue (yes, really!), thanks to the limestone in the rock, so no editing tricks needed.

What is the entrance fee for Erawan falls?
Visiting Erawan Waterfalls isn’t free, but it’s still very affordable and worth every penny.
👉 The entrance fee is 300 THB for foreigners (around £6.60 / $8.10), and 20 THB for Thai nationals.
It’s cash only, so make sure you bring some with you before heading into Erawan National Park.
If you’re driving, there’s also a car park fee of 30 THB (roughly £0.65 / $0.80) – again, nothing major, but always handy to know in advance. There’s plenty of space to park and it’s right by the main entrance to the trails.
💡NOTE: Pricing for foreigners and locals is split, as is common in many national parks across Thailand. Some tourists have been known to try to negotiate this cost, but the rates are fixed, so it’s best to plan for it. We know many people view split pricing negatively; however, we completely understand why it’s done and have no issue paying a “tourist price”.

Improve Your Photos!
✨ FREE 11 Simple Tips To Elevate Your Travel Photos ✨
Simple, practical tips to take better travel photos – whether you’re using a camera or your phone!
👉 No confusing camera speak, no settings to mess around with, just easy tips you can use straight away 👈
How much time should I spend at Erawan Falls?
This really depends on what kind of day you’re after. If you’re just there for the photos and a bit of a wander like we were, you can comfortably see the lower tiers, grab some shots, go for a quick dip and head back down in about 4 hours.
But if you’re planning to swim, relax, hike to all seven tiers and take your time soaking it all in, you could easily spend a full day here.
Just keep in mind it gets much busier later in the day and after around 10am the crowds really start to arrive, and the once-clear pools quickly turn into a sea of orange life jackets.
So our advice? Get there early, go slow, and make the most of the peace and the soft light while it lasts.

Is the Hike to Erawan Falls Difficult?
Honestly? It’s not too bad.
The trail to the top of Erawan Waterfalls is around 2 km one way and starts off really gentle. For the most part, it’s a gradual incline with some paved paths and the odd step here and there.
It can definitely get hot and sweaty, especially as the day goes on, but in terms of effort, the first half is very manageable.
From Tier 4 onwards, the path does get a bit steeper with more steps, less shade and fewer people too (which we didn’t mind!). It’s still very doable, but you’ll feel the difference.
Between Tiers 5 to 7, things start to get more challenging. Online sources mention climbing over boulders and walking up steep wooden boardwalks.
We didn’t go past Tier 5 ourselves (partly due to a bee warning), but from everything we saw and read, this last stretch is more suited to those up for a proper bit of effort.
That said, don’t feel like you have to reach the top.
- Tiers 1 to 4 are easy to access, full of beautiful sceneryand offer plenty of opportunities for great photos and a refreshing swim.
- If you’re short on time, not keen on steep trails, or just want a more relaxed visit, you’ll still get loads out of staying on the lower levels. All of our photos were taken on tiers 1 – 3.
💡Tip: If you’re carrying camera gear, take it slow and pack light. You’ll enjoy the walk more, and still come away with some cracking photos.

When Is the Best Time to Visit Erawan Waterfalls?
Best Time of Day to Visit Erawan
If you’re visiting Erawan Waterfalls for photography or even just to enjoy the scenery in peace early morning is essential.
We’d go as far as to say that if you can’t get there before 9am, you might be wasting your time.
Once it hits mid-morning, the crowds arrive and the lower pools quickly fill with swimmers in bright orange life jackets, which doesn’t exactly make for calm, untouched waterfall shots.
Early morning gives you soft light, fewer people and a better chance to take your time with photos.
We visited in April (dry season and the hottest month of the year) and arrived just after opening. It was a little sweaty, but peaceful. By the time we started heading back down, it was a completely different scene.

Best Season to Visit Erawan Waterfalls
In terms of seasons, November to January is ideal as the weather is cooler, the skies are generally clear and the water flow is just right.
It’s the perfect combo for hiking, swimming and taking photos without dealing with extreme heat or muddy trails.
Here’s a quick seasonal breakdown:👇
☀️November to January: Best overall – pleasant temperatures, clear water and softer light
🔥 February to April: Hotter and drier – still beautiful but bring water and prep for heat
☔ May to October (rainy season): Waterfalls are more dramatic, but the pools can be murky and the trails slippery which is not ideal for long exposure shots or reflections

The Seven Tiers of Erawan Waterfall (And Where to Take the Best Photos)
A tier-by-tier walkthrough with photography tips at each stage.
💡We only made it up as high as tier 5 and most of our photographs were taken at Tiers 1, 2 and 3. Info about tiers 6 and 7 has been gathered from online research.
Tier 1 – Lai Kuen Rang
- Large pool and easy access with lots of little rock pools to stand in with your tripod – ideal for wide-angle compositions
- Early morning light works well here but it’s, fairly shaded by trees so you may be okay later in the day too

Tier 2 – Wang Macha
- Large pool and easy access with lots of little rock pools to stand in with your tripod – ideal for wide-angle compositions
- Lots of logs and leaves to use as foreground in your composition

Tier 3 – Pha Namtok
- This is where most people swim as it’s so large and closest to the entrance
- More flow and cascades – perfect for shutter speed experiments

Tier 4 – Oke Nang Peesua
- Hidden feel with jungle backdrop but a little more difficult to capture as its smaller
- There are a a lot of steps to reach level 4 so have a sip of water before you start the ascent

Tier 5 – Buea Mai Long
- One of the prettiest tiers, with lush surroundings that felt like something out of a fairytale, we could’ve stayed there all day. But the moment we spotted a “bee swarming” sign and noticed a few too many buzzing about, we made a swift (and slightly panicked!) exit. Sadly this was as high as we got.


Tier 6 – Dong Prucksa
- Steep approach with a slightly trickier climb over mounds and uneven ground
- You can’t swim here but its a quiet spot as not many people make it up this high
- Watch out for monkeys! Be sure to put your water bottles and any food in your bags so you don’t attract attention and ensure you are not tempted to feed them as this is not only terrible for the monkeys themselves but its prohibited in the park

Tier 7 – Phu Pha Erawan
- There are a ton of steps up to Tier 7 but from our online research, it looks totally worth it. No crowds and a gorgeous pool you can swim in and may even have all to yourself.
1. Exact Distances Between Tiers
- Tier 1: 500m from the entrance
- Tier 2: +100m
- Tier 3: +100m
- Tier 4: +350m
- Tier 5: +500m
- Tier 6: +300m
- Tier 7: +250m
Total: Around 2 km one way, with increasing steepness after tier 4.
Short Video of our trip Erawan Falls
Check out a few clips I shot on my phone to give you a quick look at what to expect.

5 Photography Tips for Erawan Waterfalls
1. Shoot Early for the Best Light (and Fewer People)
As we’ve said before, early morning is key. The light is soft and flattering, the pools are still and you’ve got a window of calm before the crowds arrive. It’s also cooler, which makes it easier to hike with your gear. By 9:30am, the scene totally changes and brings harsher light, reflections lost and orange life jackets everywhere.

2. Think About Composition
There’s loads to work with at Erawan if you slow down and take your time checking out different angles.
- Reflections in the clear pools are perfect for creating symmetry
- Use logs, rocks, leaves or overhanging branches to frame your shots or add foreground interest
- Slow shutter shots work beautifully with the gentle cascades creating that silky water effect never gets old here
✨ Share your photos in my Travel Photography Facebook group! ✨
3. Managing Jungle Light
Shooting in the jungle means lots of dappled light, especially mid-morning. It’s a bit of a challenge, but not unmanageable:
- Bracket exposures or use an ND filter to control harsh highlights
- Overcast days can be ideal for even light
- Look for spots where the falls are in shade especially later in the morning, they’re usually more balanced for slow shutter work
4. Get in the water
For the best angles and compositions, you’ll need to get in the water with your tripod. There are loads of little spots you can do this, just be warned the fish will nibble your feet!

5. Keep it Ethical
Erawan is part of a protected national park and photography rules are strict for good reason:
- No drones allowed – it’s monitored and you’ll risk a fine
- Stick to the trails – don’t climb rocks or venture off-path for a “better angle”
- Avoid disturbing wildlife – especially the fish, birds and monkeys
- If you’re including people in your shots, especially locals, be mindful and respectful

Essential Photography Gear for Erawan Waterfall
If you’re planning to photograph Erawan Waterfalls, packing the right gear makes all the difference.
Here’s what we packed (and what we wish we’d brought):
✅ What We Packed
- Camera body + wide lens – perfect for capturing the whole scene, especially at lower tiers
- Tripod – essential if you want to do long exposures and get that silky water effect, we used the tripod for every single shot we took.
- ND filters – super helpful for managing dappled jungle light and slowing down your shutter speed
- Dry bag or waterproof pouch – non-negotiable if you’re carrying gear near the water
- Microfibre towel – great for drying off hands, gear or wiping water splashes off your lens
- Remote trigger or interval timer – handy if you want to keep your hands off the camera for slow shutter work
📸Outdoor photography comes with its own challenges!
Download our FREE photography planning guide below👇 packed with 8 simple location tips to help you capture breathtaking photos and ensure you don’t miss the golden hour!

⚠️ What to Know About Gear Safety
There are no lockers or secure storage inside Erawan National Park. If you want to swim, you’ll need to leave your bag on the rocks or keep it with someone in your group.
We didn’t feel unsafe, but it’s definitely something to think about as it does make you feel a little more one edge leaving such expensive equipment at the side of a waterfall.
Our tip:👇
- Swim only in spots where you can see your gear from the water
- Or bring a dry bag and keep essentials zipped up tight on the edge. You can even buy some that you can chain to a wooden post so they can’t be taken.

🎒 Photography Gear Tips
The trail gets steeper after Tier 4, so if you’re carrying heavier gear or multiple lenses, consider:
- Shooting more at the lower tiers where access is easier and there’s loads to capture
- Taking only the bare minimum higher up if you’re continuing to Tier 6 or 7
- Less weight = more enjoyment – especially when it’s hot and the trail starts climbing. We have learnt the lesson the hard way more than once.

12 Tips for Visiting Erawan Waterfall
Visiting Erawan is an amazing experience, but there are a few things we’d absolutely flag, especially if you’re bringing camera gear or thinking of swimming.
Here’s what we learned first-hand:👇
1. The fish nibbling isn’t for everyone
The pools especially the lower ones are full of fish that love to nibble your skin. Some people find it hilarious, but others absolutely hate it.
One of our friends genuinely couldn’t get out of the water fast enough and another didn’t even bother getting in. People were actually screaming (seriously) when the fish swarmed. If you’re not into the idea of being nibbled by dozens of tiny fish, this might be a dealbreaker for swimming.

2 .There are no lockers or secure storage
As travel photographers, this was a big one. If you want to swim, you’ll need to leave your gear on the rocks, which isn’t ideal. We brought a dry bag and only swam in places where we could keep an eye on our things. If you’re travelling solo, this is definitely something to plan around.
3. Life jackets are compulsory for swimming
You’ll need to wear one in every pool, even the shallow ones. It’s a strict park rule and the rangers do check. You can rent one at the entrance for around 20 baht, so it’s easy enough to sort, but we’ll be honest it does change the atmosphere.
Once the crowds arrive and everyone’s in the water in bright orange vests, the pools quickly lose that crystal-clear look. The sediment gets stirred up and the colour turns more murky brown than bright blue. It’s another solid reason to aim for an early start if photography is your priority before the splashing starts.

4. You’ll be asked to register your plastic bottles
You’ll pay a small deposit at the entrance for every plastic bottle you bring in, they’ll mark it with a sticker and you’ll get your money back when you leave with it. We thought this was a brilliant initiative to keep litter under control and protect the environment.
Water Bottle Tip: We recommend Water-to-Go filter bottles, as they can be used to filter almost anywhere and filter out both viruses and bacteria. Keeping you hydrated and safe and reducing single-use plastics! A simple thing you can do to protect the planet and save money while you’re at it!

5. watch out for monkeys
They apparently usually hang out near the car park and picnic areas but we didn’t see any all the way up to Tier 5 (which, honestly, we were glad about as we were focused on shooting the falls), but just remember: you’re in their space, not the other way around.
Keep your distance, don’t feed them and definitely don’t leave snacks or shiny things lying around.
6. Be mindful with sunscreen and bug spray
If you’re planning to swim, try to use reef-safe or eco-friendly products. Even small amounts of chemical sunscreen can impact the water and the wildlife, it’s one of those tiny actions that really adds up. Better yet, just wear long-sleeved wetsuits so that you don’t need to apply anything!

7. Footwear matters
The trail is fine up to Tier 4 and is mostly paved or packed dirt but after that it gets steeper and parts of it are slippery, especially near the water. Trail shoes or decent water sandals are a must. Flip flops really aren’t up to the job past the first few tiers.
8. Leave early to beat the crowds
If you’re aiming for soft light and good photos, arrive at opening time (8am). By 9:30am it starts to fill up and by midday the lower tiers are packed. We were on our way back to the car by 11am so we missed most of the midday crowds and tour buses.
9. Beware of bees
There were signs about bee swarms starting from around Tier 5 and we definitely saw quite a few buzzing around. That, along with the steepness, was our cue to turn back. It might be seasonal, but definitely something to be aware of if you’re continuing to the higher tiers.
10. Food options are only near the entrance
There’s a cluster of restaurants and food stalls near the main entrance, including Lot 6, which had some decent veggie and vegan options when we visited. But once you’re inside the park and heading up the tiers, there’s nothing available.
So definitely eat before you start the hike and bring plenty of water and a few snacks with you if you’re planning to spend a few hours exploring (which you probably will).
We recommend the amazing iced coffee!

11. Don’t forget a dry bag and towel
You’ll want to put something dry on after swimming before jumping in the car so don’t forget a change of clothes, a dry bag for your wet stuff and a micro fibre light weight towel. We wore our swim stuff under our clothes as there are no changing rooms past Tier 1 and then we just put a quick dry top and shorts back on until we got back to the toilets near the entrance.
12. Bring cash
You’ll need cash for the life jackets and any snacks and drinks you want at the entrance. It’s worth bringing a waterproof pouch like the clear phone cases to keep cash dry.

How to Get to Erawan Waterfalls?
Erawan Waterfall is located in Erawan National Park, about 1.5 hours from Kanchanaburi town by car and one of the many stunning national parks in Thailand.
The best way to get from Bangkok to Kanchanaburi is using the train which takes you through some beautiful spots in rural Thailand.
Once in Kanchanaburi, Erawan is definitely close enough for a day trip, but getting there early in the morning (which we really recommend for photography and peace) does take a bit of planning.
Can you drive to Erawan Waterfall yourself?
Yes and honestly, it’s one of the easiest and most flexible ways to visit. We hired a car during our time in Kanchanaburi and it made exploring the area, including Erawan Falls, the Death Railway and the markets super straightforward.
Driving in Thailand has always felt safe for us and we’ve rented cars for over a month in total across different trips. Just make sure you have an International Driving Permit (IDP) as you legally need this to drive in Thailand, even for a short trip.
There’s a large car park at the national park entrance and it costs 30 THB and was really easy to navigate.
We always recommend using Booking.com to book your hire car as they compare prices and the process is simple. We hired a car for over a month via Booking and had no issues at all.
However, since Kanchanaburi is a little off the main tourist track, you would need to hire in Bangkok and drive out to the area if booking through one of the more well-known car rental companies.
That said, we actually hired from this company for a few days and had no issues at all.
🚗Hiring through Booking.com was a simple experience. There was a minimal deposit of £250 (no credit card required) and free cancellation until the day before we collected the car. We could also extend the hire via WhatsApp, which would have been helpful. I am always cautious about who we hire a car from after hearing one too many horror stories and having an anxious mind, but we found this to be a stress-free hire!
Should you hire a motorbike to get to Erawan?
We wouldn’t recommend it unless you’ve got a valid motorbike licence in your home country. A lot of rental places will let you hire with just an IDP, but it’s actually illegal to ride a motorbike in Thailand without the proper licence, and your travel insurance likely won’t cover you if you have an accident.
We love a bit of adventure, but this one just isn’t worth the risk unless you’re fully licensed.

Can you take a Grab or taxi?
Grab (Thailand’s Uber) does run in Kanchanaburi and you might be able to book a ride out to Erawan but getting one back can be tricky.
Once you’re out in the more rural areas near the park, the app’s a bit hit and miss. If you go this route, we’d recommend asking your driver to wait or arranging a return pick-up time. Just don’t assume you can book one back on the spot.
What about public transport?
There is a public bus that runs from Kanchanaburi bus station to Erawan National Park. It’s a very budget-friendly option and can work well if you’re not on a tight timeline, but it’s not the fastest.
The journey takes around 90 minutes and buses only run a few times a day, so check the schedule in advance and allow plenty of buffer time.
💡Also note, it might not get you there right at 8am, so it’s not ideal for photography or avoiding the crowds.
💡TIP: We use SafetyWing Nomad Insurance and have no hesitation in recommending them for your travels. We have had personal experience of filing a claim and dealing with them as an organisation. We found the claims process straightforward, and the payout was very quick!
Can you visit Erawan Waterfall on a day tour from Bangkok?
Yes and this can be a good option if you’re short on time.
Some Bangkok-based tours include stops at Erawan Falls, Hellfire Pass and the Bridge over the River Kwai, with a driver or guide who can tailor the day to your interests.
The drive from Bangkok takes about 3 hours each way, so it’s a long day but doable if you’re keen to tick off a few highlights in one go. But if you go on a tour then you’re not going to arrive by 8am so you will likely struggle to get decent photographs without a ton of zooming in, cropping or AI editing to get rid of all of the orange blobs.
🚌Recommended Tours
👉 Group Tour: Erawan Waterfall, River Kwai & Railway Tour : From Bangkok
👉 Private Tour: Best for photographers – From Bangkok: Erawan Waterfall & Kanchanaburi Private Tour

‼️‼️Important Note: You will see elephant tours advertised A LOT in Thailand.
Please ensure you are booking with a truly ethical sanctuary where they are completely hands-off.
🐘This means No bathing – No touching – and No feeding.🐘
A truly ethical sanctuary is 100% hands-off and encourages natural elephant behaviours.
🐘 You can learn how to choose an ethical elephant sanctuary in Thailand here.
📍 In Chiang Mai? We recommend Chang Chill Sanctuary, an hour from Chiang Mai, which is the sanctuary that we chose to visit.
📍In Bangkok or Kanchanaburi? We recommend Somboon Legacy Foundation just a few hours from Bangkok, where we volunteered for a month.
🚌The only tour company we recommend for elephant tours is Seek Sophie as they are pioneers for responsible and ethical travel.
📚Please see The Call to Conserve website for a list of an up-to-date list of ethical elephant facilities in Asia.
Note: We will never recommend any tours involving animals unless we have been on these ourselves or have assurances from conservationists that they are ethical facilities.
Where to stay near Erawan Waterfall
If you want to get there before the crowds, we’d recommend staying nearby the night before.
A few good options include:👇
- The Hub Erawan Resort– Half a mile from the national park with accommodation on the river
- Lake Hill Resort Kanchanaburi – a bit further but great views and peaceful setting
- Stay in Kanchanaburi town – more restaurants, night market and transport options (about 1.5 hours away)
- The Legacy River Kwai resort – at Somboon Legacy Foundation, an ethical elephant sanctuary and combine it with seeing the eles. Further away from the National Park but doable as we drove in from here.

💡 We also saw a sign for camping, so you can probably camp on site if you want to be really inside the action!

Our Final Thoughts on Visiting Erawan Waterfall
Do we recommend it for photographers?
Yes – but with a big caveat: get there before 8am. If you’re even slightly late, you’ll be sharing the pools with dozens of swimmers in bright orange life jackets and getting clean compositions becomes nearly impossible.
But early in the morning? It’s a dream!
Is it overrated or as beautiful as it seems?
Before the crowds arrive, it’s every bit as stunning as it looks in the photos and the water really is that clear and that blue, no filter needed. But once it gets busy, the atmosphere completely shifts. It goes from tranquil jungle escape to loud, splashy chaos pretty quickly.
Would we go back?
Maybe – we’d be curious to hike up to tiers 6 and 7 since we stopped at tier 5 this time. But honestly, unless we knew we’d be through the gates at 8am again, we’d probably skip it.

What Else Is There to Do in Kanchanaburi?
If you’re piecing together your perfect Kanchanaburi itinerary, you’re in for a treat. Beyond the waterfalls, this region is full of peaceful temples, local markets, and lots of nature that are perfect for travellers who love thoughtful, ethical travel.
Here are some of our top picks for places to visit in Kanchanaburi:👇
Wat Tham Sua – The Tiger Cave Temple in Kanchanaburi
A personal favourite and easily one of the best photography spots in Kanchanaburi, this dramatic hilltop temple is perfect for wide landscape shots, drone photography, and peaceful moments away from the crowds. It’s a must-visit if you love temples and travel photography.

Somboon Legacy Foundation – Ethical Elephant Sanctuary in Thailand
If you’re looking for a hands-off ethical elephant sanctuary in Kanchanaburi, this is the one we recommend. There’s no riding, no bathing, and no performing elephants here, just a peaceful place where rescued elephants live freely. It’s one of the most responsible and respectful animal experiences we’ve found in Thailand and well worth supporting.

Kanchanaburi Night Market
A laid-back, local market that comes alive in the evening, perfect for grabbing dinner, browsing handmade goods, and soaking up some street life. It’s a great addition to your Kanchanaburi itinerary.

Wat Baan Tham
A short drive from Wat Tham Sua, is Wat Baan Tham. Another epic temple. To reach the cave, you’ll climb a staircase that feels like you’re walking into the mouth of a dragon!
The temple itself is beautifully set with the mountains behind it and the Mae Klong River in front, making a lovely spot for photography and a bit of peaceful exploring. We didn’t get a chance to go inside but managed to get a quick drone shot on the way back!

The Death Railway & Bridge Over the River Kwai
A deeply moving site that tells the story of those who suffered building the railway during WWII. If you’re interested in history, it’s one of the most important things to do in Kanchanaburi. Visit early or around golden hour for the best light and a quieter, more reflective experience.

FAQs About Visiting Erawan Waterfall
Is Erawan waterfall worth visiting?
Absolutely, especially if you’re into nature, waterfalls, or photography. The turquoise pools and jungle surroundings are genuinely beautiful and there are plenty of opportunities for amazing photos if you arrive at 8am.
Can you swim in Erawan Falls?
Yes, swimming is allowed in most of the tiers, especially the lower ones. You’ll need to wear a life jacket (even in shallow water), which you can rent near the entrance for 20 THB. Just be aware that once people get in, the water can turn murky, so if you’re after those crystal-clear photos, aim to swim early.
are life jackets really required?
Yes they’re mandatory if you want to get in the water and rangers do enforce it. Even if the water looks shallow, you won’t get away with it. We found it a bit overkill, but it’s the official policy and something to factor into your visit.
Are there toilets and changing rooms at Erawan?
Yes there are basic facilities near the entrance and around Tier 1. They’re functional but simple, so don’t expect luxury. Handy if you’re planning to swim or change after your hike.
Are there restaurants inside the park?
There are several restaurants and food stalls near the entrance and in the car park, including Lot 6 which has good veggie and vegan options. But once you start hiking past Tier 1, you won’t find any food or drink stalls so bring snacks and a water bottle if you’re going further up.

Is there free parking at Erawan waterfalls?
Yes, there’s a car park at the entrance and it costs around 30 THB. It’s spacious, but on weekends or public holidays, it can fill up, so arriving early helps.
Can you fly a drone at Erawan Falls?
No, drones are not allowed in Erawan National Park. It’s well-signposted and monitored and the rules are there to protect the peace and wildlife. It’s not worth the risk.
Will I see any wildlife at Erawan?
The pools have fish that love to nibble on your feet (which some people find hilarious and others, including our friend, absolutely hated it). You might also spot monkeys, birds and lots of butterflies. We didn’t see any monkeys up to Tier 5, but apparently they’re usually hanging around.
Where to go after Kanchanaburi?
Once you’ve soaked up the waterfalls, temples and jungle scenery in Kanchanaburi, you might be wondering where to head next.
The good news?
You’ve got some brilliant options depending on the kind of trip you’re planning.
Back to Bangkok
You could swing back to Bangkok to explore more of the city’s unique temples and historical spots, there’s so much to see that most people miss on their first visit. It’s a fab way to break up the trip and grab a few more golden hour shots of city life before moving on.
Head North
Jump on the sleeper train and head north.
This is what we did and we absolutely loved it. The overnight train to Chiang Mai is such a fun experience (plus, it saves you a night’s accommodation!).
It’s the perfect start to a northern Thailand road trip, which is full of misty mountain views, quiet temples, and honestly, some of our favourite photography spots in Thailand.
Wherever you go next, Kanchanaburi definitely sets the bar high but Thailand has so much more to explore!
✨ Share your photos in my Travel Photography Facebook group! ✨
More Thailand Inspiration!
- Visiting Phu Chi Fa Mountains in Thailand – A Photographers Guide
- 2-Week Northern Thailand Itinerary for Photographers
- How to get from Chiang Mai to Doi Inthanon National Park
- Guide to Ang Ka Nature Trail in Doi Inthanon National Park
- Pha Dok Siew Nature Trail – Doi Inthanon National Park
- How to choose an ethical elephant sanctuary in Thailand
- Kew Mae Pan Nature Trail in Doi Inthanon National Park
- Mae Ya Waterfall in Doi Inthanon National Park – A Photographers Guide
- Mae Klang Waterfall in Doi Inthanon National Park – A Complete Guide
- Mae Salong in North Thailand – A 2-Day Itinerary
- Things to do in Doi Inthanon – A Day trip from Chiang Mai
- The Overnight Sleeper Train from Bangkok to Chiang Mai
- How to Visit Thailand’s Sky Temple in Lampang
- How to Travel from Chiang Mai to Bangkok by Day Train
- Ultimate Guide to Wat Sam Phran Dragon Temple in Bangkok
- Visitors Guide To Sirithan Waterfall in Doi Inthanon
- Wachirathan Waterfall in Doi Inthanon – A Complete Guide
- 4 Beautiful Doi Inthanon waterfalls You Shouldn’t Miss
- A Complete Guide to 3 Beautiful Doi Inthanon Hikes
- A Complete Guide to Twin Royal Pagodas at Doi Inthanon
- Chang Chill – An Ethical Elephant Sanctuary in Chiang Mai
- Is It Safe to Drive in Thailand? Everything You Need to Know
- Chiang Mai Lantern Festival: Is it Worth it? An Honest Guide
- 11 Best Places to Visit in Northern Thailand for Photography
- 4 Day Chiang Mai Itinerary for Photographers
- Guide to The Tiger Cave Temple in Kanchanaburi – Wat Tham Sua
- The Photographer’s Guide to Erawan Waterfalls, Kanchanaburi
