
16 Game-Changing Tips on Travel Photography
InWanderment contains affiliate links. If you make a purchase or a booking using these links, we may receive a commission at no extra cost to you. This helps with the cost of running InWanderment. See our Privacy Policy page for more information. We appreciate your support!
Travel photography isn’t just about clicking the shutter at the right moment, it’s about planning, timing, and knowing how to navigate unpredictable conditions.
If you want to capture incredible images, you need to be more than just a photographer. You need to be an expert at planning your shoots.
This guide goes beyond just camera settings and composition. It covers everything from choosing the right gear and researching locations to working with natural light, finding unique perspectives, and handling the logistics that come with travelling for photography.
We’ve done our fair share of travel photography planning boo-boos. We once travelled for 2 hours after paying for a private driver only to realise we’d left our Memory card in the hotel room. It sounds ridiculous, but this kind of thing happens all the time.
We’ve been in your shoes. After years of photographing around the world, we’ve learned that the best shots don’t just happen, they’re carefully planned.
In this guide, we’ll share the best tips on travel photography that will help you avoid the mistakes we’ve made and capture the shots you envision.
If you want to take your travel photography to the next level, from planning the perfect sunrise shoot to making sure you never miss a crucial moment.
We’re about to give you all the travel photography hacks you’ll need to succeed!

Sony A7R3 – Camera Settings – ISO-1000, f/5, 1/80sec, 25mm
1. Get Comfortable Using Your Camera
Mastering your camera before you travel is essential. One of the key travel photography tips is to familiarize yourself with your camera settings, like manual mode and aperture priority mode before you arrive at your destination.
When you’re on location, time is limited, and you don’t want to waste precious moments fumbling with settings.
Understanding how to adjust your camera quickly ensures you can capture scenes exactly as you envision them.
It also means fewer missed shots and less frustration when sorting through your images later.

Sony A7R3 – Camera Settings – ISO-160, f/14, 1/2 sec, 16mm
Do you know how to adjust the shutter speed to capture a waterfall with a smooth, flowing effect? Or how to photograph a subject in sharp focus while keeping the background beautifully blurred?
If not, then it’s a good idea to read some information on how to do so and practice before you go.
The more familiar you are with your gear, the more confident and creative you’ll be in the field, leading to better travel photos.
2. Shoot at Golden Hour & Blue Hour
Golden hour and blue hour photography can really make your travel pictures stand out from the rest. The best time to take outdoor photos is around sunrise and sunset when the light is at its most magical.
The golden hour, about an hour after sunrise and an hour before sunset, creates soft warm tones and beautiful contrasts in your images.

Mavic 3 – Camera Settings – ISO-100, f/9, 1/200 sec, 12mm
For sunrise shoots, aim to arrive at least 30 minutes beforehand. This gives you time to find a strong composition before the best light appears.
Before heading out, check whether your chosen location allows entry before sunrise. We’ve arrived at photo spots only to find them closed, though in many cases, security guards have kindly let us in early.
For sunset photography, getting there a couple of hours beforehand lets you work with softer light leading up to the main event.
And don’t pack up right after sunset, staying an extra hour lets you capture the blue hour when the sky is at its most colourful.

Sony A7R3 Camera Settings – ISO-100, f/8, 1/200 sec, 46mm
📸 FREE Guide – 11 Simple Tips To Elevate Your Travel Photos
✅ Designed to help anyone take better travel photos, with no technical jargon, no confusing settings, and no need for fancy gear.
🎉 Simple, practical tips to take better photos – whether you’re using a camera or your phone!
3. Find accommodation as close as possible to your photoshoot
Booking accommodation close to your photo spot can make sunrise shoots much easier.
Being able to just get out of bed, walk five minutes down the road and start shooting has been a game-changer for us. Here are some reasons why you should do it too.
- You don’t have to wake up hours before sunrise to get to the location.
- There’s no need to look at traffic or arrange a driver.
- The only reason you will miss the sunrise is if you sleep too late.
- If you forget something you can just quickly run back to your room.
- You won’t miss breakfast at your hotel
- You can scout the location before you go to take photos
- After shooting you can just return to your room and sleep again if you’re tired
While this often means skipping luxury stays, choosing locally run hotels and homestays has only enriched our travel experiences.

Mavic 3 – Camera Settings – ISO-100, f/11, 1/160 sec, 12mm
Want to improve your travel photography but not sure where to start?
📸 Join Travel Photography Fast-Track – Personalised 1-on-1 coaching to take your travel photography to the next level!
Not ready for coaching?
✨ Try Photo Feedback+ – Get expert feedback and a step-by-step plan to transform your photos.

4. Get Permission to Photograph People
When photographing people during your travels, it’s important to do so with their knowledge and respect.
When we first started, we were too scared to speak to anyone. We even got our driver in Morocco to ask a man riding a donkey if we could take his photo.
His friends laughed while we took his photo, but they were all really friendly. Before we got back in the car, we ended up shaking hands with everyone around us!
Approaching a stranger for a photo can initially feel uncomfortable, but with the right approach, it becomes much easier.
Here are a few travel photography tips to break the ice and get natural, authentic portraits.
- Learn some phrases in the local language, such as “hello”, “thank you” and “can i take your photo?”
- Smile at your subject – Even if you don’t learn the language a simple smile goes a long way
- Be clear on your intentions – Make it obvious you’re taking photos of the surroundings so it doesn’t look like you’re just photographing one person.
- Buy something from a vendor – This is a great way to establish trust and build rappore.
- Ask someone directly for a photo – You’ll have to really step out of your comfort zone at first. But the more you do it the easier it gets!
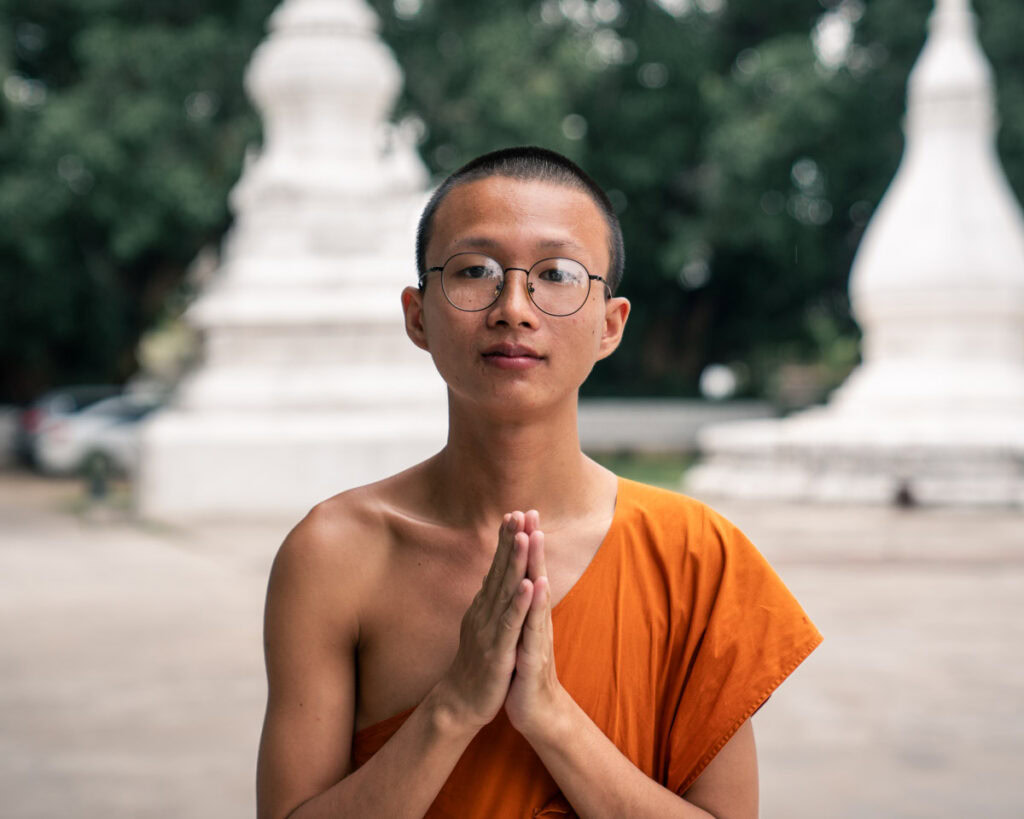
Sony A7R3 – Camera Settings – ISO-250, f/3.2, 1/200sec, 70mm
5. Research Locations
Good research is the foundation of great travel photography. You will need to photograph many different things to be able to truly capture what a place is like. Think of yourself as a travel journalist going to a country to find out what the people there are like, how they live and what they enjoy doing.
Getting some travel photography ideas before you arrive helps you make the most of your time and take better travel photos.
- Use google search – Type in the name of a location followed by “travel photography”
- Use google maps – Some of the best destinations we have found by simply clicking around the area on google maps and seeing what comes up.
- Use google earth pro – This gives you a 3D map of the landscape and can show you which direction the light will be during your shoot.
- Use Instagram – Most travel photographers use Instagram to post their work. You can also google a place and check the most recent photos to see what it’s like now.
- Check the work of famous travel photographers – See if they have been to the same spot and what photos they wook then they were there.
- Use travel photography books and magazines – They’re packed with interesting things to see as well as festivals and cultural events. Try reading articles on National Geographic, or buy a Lonely Planet guide on the location.
- Be aware of the seasons – check what the place will look like when you’re visiting. After all you can’t go chasing cherry blossoms in Japan during winter.
📸FREE Photography Guide
Want to take your photography skills to the next level?
Download our FREE photography planning guide! It’s packed with 8 simple location tips to help you capture breathtaking photos, no matter your skill level.
Simply enter your details below, and we’ll send you the guide along with additional tips and tricks to inspire your photography journey. Whether you’re a beginner or looking to refine your craft, this guide will set you up for success.
Download our FREE guide below👇

Mavic 3 Camera Settings – ISO-100, f/5.6, 1/800 sec, 12mm
6. Make a Shot List
A shot list helps you stay focused and ensures you capture a series of images that work together to tell a compelling story about a place.
Use photos you have seen as examples. You could even store the photos in your notes app for reference when you’re at the location.
It also reduces stress, once you’ve ticked off your must-have shots, everything else is a creative bonus.

Sony A7R3 – Camera Settings – ISO-800, f/2.8, 1/80sec, 170mm
Below is a general shot list you can use
- Drone shot – Send up the drone to take a photo of the landscape/city.
- Wide shot – An establishing shot that shows the whole scene.
- Mid-range shot – Showing how people interact with the surroundings.
- Closeup shot – Intricate details of items or activities that are unique about that place.
We suggest taking multiple photos of each type of shot.
Use this list as a foundation and expand on it by incorporating elements you’ve researched, allowing you to craft a story about a place before you even arrive.
7. Arrange Photo Shoots
Planning photo shoots in advance can be a game changer, allowing you to capture specific shots with minimal stress.
There are two different ways you can arrange a photography shoot.
You can simply book one online.
Or you can arrange one with a local photographer.
Whether it’s working with locals or booking a guided tour, setting things up beforehand ensures you make the most of your time and get the images you envision.

Mavic 3 – Camera Settings – ISO-100, f/8, 1/1000 sec, 12mm
– Arranging with Locals
One of the best ways to find hidden photography spots is by reaching out to locals. If you come across a photo on Instagram taken by someone from the area, consider messaging them directly.
Many are happy to take you to the location for a small fee. We did this a lot in Java, and it led to some of our best travel photography experiences.
If you spot someone in traditional dress, don’t hesitate to ask if they’d be open to being photographed in a specific location.
Many people take pride in their cultural attire and may be happy to participate, especially if you approach them with respect and offer compensation when appropriate.

Sony A7R3 – Camera Settings – ISO-100, f/4, 1/2000sec, 16mm
– Booking a Photography Tour online
Photography tours can take a lot of stress out of planning. The guides know exactly where to go, the best times for lighting, and any logistical challenges you might not have considered.
It also means you don’t have to worry about arranging permissions or negotiating with locals, the guide handles everything, letting you focus purely on your photography.
For those who prefer a more hands-off approach, tours offer an easy way to access stunning locations without the need for direct communication.
Whether it’s a private workshop or a group tour, they can be a great way to level up your travel photography while learning from experienced professionals.
8. Go Off the Main Tourist Route
Capturing unique travel photos often means stepping away from the usual tourist spots.
A crucial tip on travel photography is to go beyond the usual tourist spots to create images that make your portfolio stand out.

Sony A7R3 Camera Settings – ISO-100, f/8, 1/200 sec, 46mm
Sometimes, all it takes is a little extra research. We discovered the Sky Temple in Thailand simply by exploring Google Maps, and it turned out to be one of the most incredible locations we’ve ever photographed.
Hiring a local driver can be a great way to reach off-the-beaten-path spots, as they often know scenic routes and lesser-known areas. Just be sure to check the safety of the location before heading out—some remote areas might not be easily accessible or may require permits.

Sony A7R3 – Camera Settings – ISO-100, f/20, 1/5sec, 20mm
9. Edit Your Photos
Post-processing is an essential part of travel photography, and one of the top tips on travel photography is to shoot in RAW mode for maximum editing flexibility. This helps to bring out the best in your images.
Shooting in RAW mode gives you the most flexibility when editing, allowing you to adjust exposure, colours, and details without losing quality.
Editing can also help remove distractions. Many modern editing programs include object removal tools, making it easy to clean up your frame. The composition can be improved by cropping and straightening horizons, ensuring a polished final image.
A well-edited photo not only enhances your creative vision but also helps your work stand out. This will get you noticed when you post your photos on social media.

✨ Share your photos in my Travel Photography Facebook group! ✨
10. Make a Checklist for the Night Before the Shoot
Forgetting essential gear can ruin a shoot, and we’ve learned this the hard way. Realising your memory card is missing after travelling two hours to a location is a nightmare, so preparation is key!
Here’s a simple checklist to go through the night before:
- Check all batteries are fully charged.
- Ensure your memory card has enough space.
- Bring a backup memory card in case of failure.
- Pack all necessary equipment—camera, good lenses, tripod, filters, and any other accessories.
- Confirm your driver (if applicable) is still coming in the morning.
- Prepare food and water if you’re heading to a remote location with no nearby options.
Use this list and build on it to adjust it to your personal needs.
Taking five minutes to go through this list can save you a lot of frustration and missed opportunities.
11. Find Unique Compositions
While it’s fine to replicate shots when you’re starting out, the key to great photography is adding your own creative touch.
If an existing image inspires you, try changing something by adding a subject, shooting from a different angle, or visiting the same spot at a different time of day for unique lighting.

Here are a few ways to make your travel photography compositions stand out:
- Look for leading lines, reflections, frames, and patterns to guide the viewer’s eye.
- Use foreground objects (like lilys) to add depth and storytelling.
- Try different angles, crouch on your knees, lie on the ground, and stand on top of a bench.
- Experiment with a drone for a fresh aerial perspective.
- Use the rule of thirds to give space to the main subject of your photo
One of the best long-term tips on travel photography is to develop a unique style.
This takes time, but you’ll start producing images that truly stand out by thinking creatively and exploring different techniques.

Would you like to connect with other photographers who share your passion?
✨ Exclusive content on finding beautiful photography locations – how to get there, the best times to visit, and what shots to capture!
✨ Tips, advice and tailored support on photography gear and techniques!
✨ Inside information on the best photo spots in specific locations to help you plan your next trip!
✨ Connecting with other Travel Photography lovers!
12. Choose suitable gear for travel
One of the key tips on travel photography is choosing the right gear by finding a balance between quality, versatility, and weight.
The best setup is one you can comfortably carry all day while capturing the needed shots. Here’s what to consider when you’re purchasing camera equipment.

– Prioritise Lightweight Gear
Travel photography often means long hours of walking, hiking, or navigating crowded streets. Carrying heavy equipment can quickly become exhausting, so weight should be a top priority.
- Check the combined weight of your camera and lens. Will it be comfortable to carry around your neck or over your shoulder for hours?
- Weigh your entire backpack, including accessories, to make sure you can manage it all day.
- Consider the weight of the bag itself. Some camera bags are unnecessarily heavy. Look for lightweight but durable options.
– The Holy Trinity of Lenses
Zoom lenses are the go-to choice for travel photographers because they offer flexibility in a variety of shooting situations. While no single setup covers everything, a combination of three lenses will handle most travel photography needs:
- Wide-angle zoom (16-35mm) – Perfect for landscapes, architecture, and interior shots.
- General zoom (24-70mm) – A versatile all-rounder for portraits, street photography, and everyday scenes.
- Telephoto zoom (70-200mm) – Great for compressing perspective, capturing distant subjects, and getting creative with depth.
These three lenses won’t cover specialized fields like close-up wildlife or macro photography, but they’re enough for most travel scenarios. Invest in lenses with a low f-stop number (like f/2.8) to allow for better low-light shooting. And, as always, choose the lightest versions you can find to keep your gear manageable.
– Carry Your Camera in Something Easily Accessible
Quick access to your camera can mean the difference between getting the shot and missing it. Some photographers prefer traditional camera backpacks, but they can be slow to open. I personally use a Vans shoulder bag that isn’t designed for photography at all.
This setup has two big advantages:
- Easy access – I can grab my camera quickly without having to stop and unzip a bulky bag.
- Less attention – A non-camera bag doesn’t scream “expensive gear inside,” making it less of a target in areas where theft might be a concern.
There is, however, a big drawback to carrying my camera this way. The bag has no padding, so it offers my camera very little protection.
I do feel like I’m taking a risk carrying my camera this way, so be aware that this is my preference and not something I recommend. Also the camera hits into my chest, so after a long day it can feel quite sore.
If you prefer a camera-specific bag, look for one with side access or a sling-style design to keep your camera within reach.

Sony A7R3 – Camera Settings – ISO-400, f/5, 1/40 sec, 30mm
– Additional Gear to Consider
Beyond cameras and lenses, a few extra pieces of equipment can make a big difference in your travel photography experience:
- A lightweight tripod – Essential for low-light, long-exposure, and self-portrait shots. Look for carbon fibre options to reduce weight.
- Lens filters – A polarising filter helps cut reflections and deepen sky colours, while ND filters allow for creative long exposures.
- Extra batteries and memory cards – You don’t want to run out of power or storage mid-shoot.
- A weatherproof cover – Protects your camera from unexpected rain or dust. If you don’t have one, even a simple plastic bag can work in a pinch.
- A small microfiber cloth – Essential for cleaning lenses, especially in humid or dusty environments.
- A drone – If you really want your images to stand out from the rest a drone is pretty much essential gear for a travel photographer.
Choosing the right travel photography gear is all about keeping things light, versatile, and accessible. The less you have to worry about your equipment, the more you can focus on capturing incredible shots.
❓Confused About Which Camera Or Gear To Buy?
👉Let Us Do the Hard Work and find your perfect match!💞
Stop wasting hours lost in endless camera reviews, let us do the hard work and find the perfect match for you with our Custom Camera Match Service

Mavic 3 – Camera Settings – ISO-100, f/11, 1/8 sec, 12mm
13. Take Care of Yourself
Travelling for photography is far more demanding than a regular holiday. Early mornings, long days, and constant planning can be exhausting.
It’s easy to get caught up in the excitement, but taking care of yourself is just as important as getting the shot.
- Factor in downtime and rest days. Burnout can creep up fast when you’re constantly chasing the next sunrise or sunset. Pay attention to how you’re feeling when you’re out shooting. A complete lack of enthusiasm can suggest you’re burnt out.
- Eat enough to keep your energy levels up. Photography days can be physically demanding, so make sure you’re getting at least three solid meals, or more if needed.
- Stay hydrated. This seems obvious, but when you’re out shooting all day, it’s easy to forget. Always carry a bottle of water, especially in hot climates.
14. Make Backups—And Backups of Those Backups
Losing months of travel photos is a nightmare no photographer wants to experience. Unfortunately, we learned this the hard way in Kuala Lumpur when Emma accidentally deleted two months of her photos.
Luckily we still had the images from our main camera but we were still very disappointed.

Sony A7R3 – Camera Settings – ISO-250, f/4, 1/800sec, 25mm
Since then, we’ve put strict backup measures in place to make sure it never happens again.
- Use at least two or three physical backups. We keep copies on separate external hard drives to reduce the risk of losing everything.
- Use a cloud service when possible. Uploading large files while travelling can be slow, but whenever we have access to fast internet, we back up as much as we can.
- Keep photos on multiple memory cards. Instead of relying on one large card, we use several smaller ones. This way, if a card gets corrupted or lost, we don’t lose everything.
- Never format memory cards until you’re certain everything is backed up. We keep the images on the cards as long as possible, just in case.
💡TOP TIP – Conventional Disk-type hard drives are easier to restore photos from. With the new faster SSD drives it’s impossible to retrieve anything once deleted.
We use an SSD for our everyday working due to the speed, with everything also backed up on an HDD. This means we get the benefits of both types of hard drive.
15. Budget for Private Tours and Transport
Travel photography comes with extra costs that general tourism doesn’t. Getting the best shots often requires private transport, early access, or accommodation in premium locations.
- Hiring a car is ideal when possible. It allows you to carry all your gear easily and gives you complete freedom over your schedule.
- When renting a car isn’t an option, hire a private driver. Public transport often doesn’t work for sunrise or sunset shoots, so having a driver for a few hours or a full day is often worth the extra cost.
- Choose accommodation based on location rather than price. Staying close to your photography spots can save hours of travel time. Sometimes this means staying in budget homestays, while other times it’s worth paying extra for a prime location.
Spending a little bit more on logistics can make a huge difference in the quality of your photos and the overall experience.
We hired a private driver in Yogyakarta who took us to many different places. Due to our different travel style, even he got to experience many things that he wasn’t aware of in his own country.

Sony A7R3 – Camera Settings – ISO-100, f/8, 1/200sec, 40mm
16. Make Sure Your Gear Is Insured
We always include insurance when giving travel tips, even for non-photographers. However, as a travel photographer, you need to take some extra things into consideration.
Travel insurance often falls short when it comes to expensive photography equipment. Standard policies usually have a 30-day limit, making them unsuitable for long-term travel.

Additionally, most policies have a single-item limit that won’t fully cover high-end camera gear.
To make sure your equipment is properly protected:
- Check if your existing insurance covers your camera for travel. Some home insurance policies allow add-ons for valuable items.
- Consider specialist photography insurance. Some providers offer worldwide coverage for professional gear.
- Read the fine print. Ensure your policy covers theft, accidental damage, and loss, and confirm any country-specific exclusions.
Losing or damaging a camera while travelling can be devastating, having the right insurance ensures that if the worst happens, you’re covered.
Frequently asked questions about travel photography
What are the dont’s of travel photography?
Here are a few simple things we don’t recommend doing while travelling for photography.
Don’t store all your photos in one place
Don’t stick your camera in someone’s face without asking
Don’t be offended if someone asks for money after you photograph
them
Don’t forget to take breaks from taking photos
Can you take good travel photos with a phone?
Yes, you can take great travel photos with a phone, but it does have limitations. Most smartphones have wide-angle lenses, which can make your shots look repetitive and limit creative composition. While a phone is convenient, a dedicated camera offers more versatility in focal lengths and image quality.
Should I shoot in RAW or JPEG while travelling?
Shooting in RAW gives you more flexibility for editing, while JPEGs are ready to use immediately. If your camera allows, shoot both for the best of both worlds. Otherwise, decide if you want quick, usable photos (JPEG) or are willing to spend time editing for better quality (RAW). It depends on your workflow preference.
Do I need a tripod for travel photography?
One of the most influential Instagram travel photographers has never used a tripod. While a tripod is beneficial for landscape photography, long exposures, and low-light shots, most other types of travel photography don’t require one. If you prefer to travel light and shoot handheld, you can still capture stunning images without carrying extra gear.
What’s the best way to keep my camera safe from theft while travelling?
To keep your camera safe, avoid going out at night unless it’s a very safe area. Store it in your hotel locker when not in use. Use a discreet bag instead of a camera-specific one, and keep your camera put away when not shooting. Staying aware of your surroundings also helps prevent theft while travelling.
Final Thoughts
Mastering travel photography is more than just having the right gear, it’s about preparation, creativity, and knowing how to adapt to different conditions. By planning ahead, using the best light, researching locations, and practising these different travel photography techniques, you’ll set yourself up for success.
We know how overwhelming it can feel at first, missing shots, struggling with settings, or arriving at a location at the wrong time. But with these game-changing travel photography tips, you’ll avoid those frustrations and start capturing images that truly reflect the beauty of your travels.
Now, it’s time to put what you’ve learned into action. Join our Facebook group to connect with like-minded travel photographers, share your work, ask questions, and get feedback from a community that understands the journey. Let’s keep learning and growing together!
Would you like to connect with other photographers who share your passion?
✨ Exclusive content on finding beautiful photography locations – how to get there, the best times to visit, and what shots to capture!
✨ Tips, advice and tailored support on photography gear and techniques!
✨ Inside information on the best photo spots in specific locations to help you plan your next trip!
✨ Connecting with other Travel Photography lovers!
Tips to elevate your photography
- Mastering What Shutter Speed to Use for Perfect Shots
- Must Have Travel Photography Gear for Your Next Adventure
- How To Find Photography Spots: A Travel Photographers Guide
- When is the Best Time to Take Pictures Outside?
- Best Lens for Travel Photography: What to Pack and Why
- 17 Photography Composition Techniques for Top Travel Photos
- Understanding Aperture: Examples & Photos for Beginners
- Practical Tips to Elevate Your Photography on a Cloudy Day
- 21 Tips for Photographing Mountains
- Ultimate Guide to Perfecting Waterfall Photography
- What is Travel Photography? Start your adventure today!
- 11 Types of Travel Photography Every Traveller Should Explore
- 16 Game-Changing Tips on Travel Photography
- Beginners Guide To Photographing People While Travelling
Beautiful Photography Destinations
- Isle of Skye Photography Guide – 15 Stunning Locations
- 13 Beautiful Places for Landscape Photography in Scotland
- 10 Beautiful Places in North Wales UK for Photography
- Snowdonia Photography – 11 Breathtaking Locations
- How to Spend a Weekend in Cornwall – A 2-Day Itinerary
- Five of The Best Dorset Photography Locations
- Wachirathan Waterfall in Doi Inthanon – A Complete Guide
- How to Visit Thailand’s Sky Temple in Lampang
- Visiting Phu Chi Fa Mountains in Thailand – A Photographers Guide
- Mae Salong in North Thailand – A 2-Day Itinerary
- Mae Ya Waterfall in Doi Inthanon National Park – A Photographers Guide
- Mae Klang Waterfall in Doi Inthanon National Park – A Complete Guide
