
Understanding Aperture: Examples and photos for beginners
InWanderment contains affiliate links. If you make a purchase or a booking using these links, we may receive a commission at no extra cost to you. This helps with the cost of running InWanderment. See our Privacy Policy page for more information. We appreciate your support!
Aperture is the adjustable opening in a camera lens that controls the amount of light that enters the camera.
Mastering aperture is one of the most powerful tools a photographer can use to transform their images—but it can also be one of the most confusing.
Have you ever wondered why your background isn’t blurred as beautifully as the photos you admire?
Or struggled to get your subject and surroundings sharp in the same shot?
You’re not alone.
When we first started learning about photography, understanding aperture felt like deciphering a foreign language.
Aperture affects both exposure and depth of field, and its relationship with f-stop numbers can feel counterintuitive. But through years of hands-on experience, we’ve cracked the code and are here to make it simple for you.
This blog will guide you through aperture examples, practical exercises, and beginner-friendly tips to help you unlock its creative potential.
Ready to level up your photography?
Let’s dive in—and if you have your camera handy, follow along with our practical exercises for an interactive experience!
What is aperture in photography?
Looking closely inside your lens, you will see a circular diaphragm with an opening in the middle. These are the aperture blades inside your lens.
They look very similar to the human eye. And they have the same function. The blades inside open and close to allow more or less light into the camera, just like a pupil dilates and contracts depending on how much light there is.

Allowing more light into the camera with a wide-open aperture will increase the exposure and give you a brighter image. Allowing less light into the camera with a narrow aperture will cause the image to be darker.
The diagram of aperture below shows the blade positions for narrow to wide apertures.

Aperture is one of the three parts of the exposure triangle (shutter speed, ISO, and aperture), and together, these settings form the backbone of manual photography.
Mastering aperture is the first step to achieving stunning, intentional shots.
How to adjust aperture on your camera: Practical Exercise
Ready to see the aperture blades in action? It’s pretty dang cool if you ask me.
Adjusting aperture on your lens
Some camera lenses allow you to change the aperture by turning the aperture ring on the lens. If you cannot change the aperture of your lens, skip this section.
We are going to adjust the aperture setting on the lens. While doing so, we will look inside the lens to see the aperture blades opening and closing.

Follow the steps below to do this safely.
- Remove the back of the cover of the lens or detach it from the camera.
- IMPORTANT: If you have removed the lens from the camera, either fit the protective camera body cap over the lens mount. Or fit another lens to the camera to protect the sensor while performing this exercise.
- Hold up the lens to a bright background like a white wall or the sky outside of a window.
- Turn the aperture ring left and right to open and close the aperture blades.
- Look inside the front of the lens while doing so to see the blades working.
- Now, change it to the lowest aperture number on the lens, e.g. 3.5, and observe what happens. The diaphragm is now fully open.
- Change the setting to the highest aperture number on the lens, e.g. 22, and observe what happens. The diaphragm has just a small opening.
You have observed first-hand what changing the aperture setting does to the aperture blades inside your lens.
📸FREE Photography Guide
Want to take your photography skills to the next level?
Download our FREE photography planning guide! It’s packed with 8 simple location tips to help you capture breathtaking photos, no matter your skill level.
Simply enter your details below, and we’ll send you the guide along with additional tips and tricks to inspire your photography journey. Whether you’re a beginner or looking to refine your craft, this guide will set you up for success.
Download our FREE guide below👇
Adjusting aperture on your camera
For those of you who do not have an aperture setting ring on your camera lens, follow the steps below.
- Firstly you will need to rotate the Mode Dial on your camera to the Manual setting by rotating it until the M symbol lines up with the marking on the camera body.

- Now you will need to find out how to change the aperture setting on your camera. I’m afraid you will have to do this by yourself as thousands of cameras are out there and we won’t be able to cover all of them. Here is a hint: you can change the aperture setting on most modern cameras by turning one of the round dials on the camera body.
- Once you have figured out how to change the aperture setting, check on the screen to see if the aperture is changing. You can do this by looking for the aperture indicator. Sometimes, the number will have an F in front of it, indicating the Fstop number (more on this terminology later).

- While adjusting the aperture setting on your camera look inside the front of the lens. Make sure you’re doing it in a well-lit area to be able to see the aperture blades.
- Adjust the aperture to its lowest setting, e.g. 3.5, and observe what happens. The diaphragm hole is large and fully open.
- Adjust the aperture to its Highest setting, e.g. 22, and observe what happens. The diaphragm hole is now small.
Did you see the aperture blades opening and closing? Try doing this a few times so you really understand the physical changes inside your camera when you are adjusting the aperture setting.
One thing you may find confusing is that the smaller the aperture number, the wider the opening. This feels a bit backwards at first, but we promise you will get used to it after a while!
With this in mind, remember that when you talk about the maximum aperture of a lens, it means the maximum the aperture blades can open. So, for a lens with an aperture of 2.8 – 22, the maximum aperture is 2.8, and the minimum aperture is 22.
The larger the aperture hole, the smaller the number; the smaller the aperture hole, the higher the number.
Simply remember: a smaller number equals a wider opening.
Want to improve your travel photography but not sure where to start?
📸 Join Travel Photography Fast-Track – Personalised 1-on-1 coaching to take your travel photography to the next level!
Not ready for coaching?
✨ Try Photo Feedback+ – Get expert feedback and a step-by-step plan to transform your photos.

What is aperture priority mode?
We highly recommend using aperture priority mode when first getting to grips with adjusting the exposure settings on your camera.
Shortly after buying our first “proper” camera, we read that we needed to get off auto mode, and we thought that meant using manual mode.
We then took a trip to Marrakech as we had an interest in becoming travel photographers.
We took hundreds photos, and a lot turned out pretty awful because we didn’t understand how to use manual mode properly.
We understood aperture, but not the other elements. If only we had known about aperture priority mode, we could have come away with much better-looking photos!
Your camera will take care of all other aspects of exposure for you, but you will have full control of the aperture setting. Aperture priority mode will adjust the shutter speed and ISO settings automatically depending on your chosen aperture.
How to select aperture priority mode:
You can select aperture priority mode by spinning your camera mode dial to the letter A or AV. Not all cameras come with a mode dial, but you may still be able to select aperture priority and manual mode through the camera settings screen.

What is Fstop, and is it different from aperture?
An aperture of 4.0 is also Fstop 4.0.
The F-stop value is a measure of the amount of light that is let into the camera. So the wider the aperture, the more light is let into the camera. Confusingly, the more light that gets let into the camera, the lower the Fstop number will be.
A wide-open aperture will have a value of F1.4, for instance, even though it lets the most light into the camera. A value of F22 lets a very small amount of light into the camera despite being a higher number.
Our advice here is to try not to think too much about it. Remember that the lower value is a wider aperture, and the higher value is a narrow aperture.
Sometimes, you will hear photographers use “a stop of light”. This can also be confusing as a stop of light is not one unit of Fstop; rather, it is the F-number multiplied. For example, if you are taking a photo at F4 and want to increase the exposure by one stop of light, then you will increase to F8.
What is depth of field?
We now know that aperture affects the amount of light that enters the camera, but it also changes the “depth of field”, what the hell is that I hear you ask?
It took us a long while to fully understand how aperture works.
In fact, to this day, I still look at images and think, damn, I wish I used a different depth of field when I took that photo.
While speaking to a young monk in Laos we asked him if he could hold up his adorable puppy for a photo. With the language barrier and little time to prepare, we took the shot at F2.8.
The photo on the back of the camera looked great. But when we got home, we realised that the puppy was out of focus and the photo wasn’t nearly as good as we had hoped.

There can be complicated explanations for depth of field with scientific phrases such as hyperfocal distance. But if you’re a frequent visitor to our blog, you will know we don’t like all these confusing science-based answers here.
The depth of field determines how much of the image is in focus. A wide aperture will give you a shallow depth of field, meaning only part of the photo will be in focus.
A narrow aperture will give you an image where everything is focused. Depth of field can be measured at distances away from the camera.
Let me introduce you to Fred, the photographer (pictured below) – Here’s a quick story to help you understand:
Fred, our fictional hiking photographer spots a deer and wants to photograph it. He only wants to photograph the deer, not the surroundings. He selects a low aperture number of F4.0 to give himself a shallow depth of field, and then he focuses on the deer. That means the deer will be in focus, the grass in front of the deer will be blurred, and the trees behind will be blurred.

Fred is pretty pleased with his photo as he can make out all of the details of the deer. But now he’s realised that the very green grass in front of the deer creates a nice colour contrast and wants to try getting both the deer and the grass in focus. He selects a mid-range aperture of F8.0 and focuses on a rock between the deer and the grass.

Now Fred feels like he’s really on a roll. He’s taken two pretty great shots, but he just remembered he saw an advert for a landscape photography competition in the newspaper this morning. He wants to take a photo of the whole landscape, including the trees behind the deer and the grass in front. He selects a smaller aperture of F14 and focuses on the deer once more, as it is halfway between the grass and the trees behind.

Fred is really happy now. He’s so glad he read InWanderment’s blog on aperture before heading out hiking that weekend! He understood how changing the aperture could affect how much of the scene in front of him would be in focus.
✨ Share your photos in my Travel Photography Facebook group! ✨
Wide aperture examples

By now, you should understand that a wide aperture gives you a shallow depth of field, giving you a sharp image of the subject that you have focused the camera on and a blurred foreground and background.
Below, we will show you some different aperture examples so you can see these effects in action.
A large aperture such as F2.8 is well suited for photographing people, wedding photography, and wildlife photography. This is because we’re usually not interested in what is happening around the photo’s subject. The photo is about the person or animal, and the photographer wants as little distraction in the image as possible.
Below is a wide-aperture example of an Orangutan and its baby that we photographed in Borneo. Behind the Orangutan, there was some vegetation that was not too dense, which looked very messy. So we used a low Fstop value of F3.5, focused on the baby orangutan’s face and shot this image.
As you can see, the baby orangutan and its mother are nice and sharp in the image. You can see the detail in the fur and the wrinkles on their faces. The vegetation behind them is blurry and looks almost like a painted background.

Before visiting the Thaipusam festival in Kuala Lumpur, we read that over one million people would visit the site. At that time, we knew we would need to use a shallow depth of field for this type of travel photography, to isolate the parts of the festival we found interesting and wanted to highlight.
In the wide aperture example below, one of the devotees is carrying her offering to the shrine of Batu Caves Temple while in a hypnotic trance. With blood on her face from ritual piercings and her otherworldly expressions, she was the perfect subject for a photo.
But amidst the surrounding crowd, she would not have stood out quite so prominently. We chose to take this photo at an aperture value of F2.8 while focusing on her eyes.

📸 FREE Guide – 11 Simple Tips To Elevate Your Travel Photos
✅ Designed to help anyone take better travel photos, with no technical jargon, no confusing settings, and no need for fancy gear.
🎉 Simple, practical tips to take better photos – whether you’re using a camera or your phone!
Mid-Range Aperture Examples
Mid-range apertures usually sit around F4 – F8. These aperture values will give you a nice balance of keeping the subject sharp and in focus while slightly blurring the surroundings. This is great when you have the subject you have focused on as the main focus of the image, but you also want to show their surroundings.
A clear summer morning in the farming region of Trawas in Java gave an excellent opportunity to highlight daily life for the typical Javanese villager. The mid-range aperture example below was captured using an aperture value of F5.6. This gave enough depth of field to see what the farmer was doing but also significantly blurred out the foreground, which was quite messy and distracting.

We often use a mid-range aperture in Landscape photography if the foreground has a lot going on and is likely to distract from the photo’s main subject. This can make for a messy composition. This is often the case when photographing waterfalls.
In the mid-range aperture example below of a waterfall in Java, the foreground is a wonderful shade of green, and the foliage is also appealing. But the foreground could distract too much from the waterfall if it was in focus.
We chose to use an aperture value of F7. As you can see, the waterfall is sharp in the photo, and the foliage in the foreground is in focus enough to see the leaves on the plants but not so much that it looks messy and distracting.

Narrow aperture examples
Narrow apertures can range anywhere from F8 to F16 and are also called small apertures. In landscape photography, you often want the whole image to be in focus, from the little rocks in the foreground to the tall mountains behind. And this is the situation where you’re most likely to use narrow apertures, particularly as a beginner.
It’s also worth noting that due to the small amount of light that a narrow aperture lets into the camera, you typically need a lot of light. That’s why narrow apertures are more commonly used when taking photos outdoors.
Narrow apertures can also be useful when you want to photograph a landscape, but you only have a brief moment to do so, such as on cloudy days when the sun is shining through the clouds for brief moments. Getting everything in focus in one shot is the only way to capture these beautiful moments.
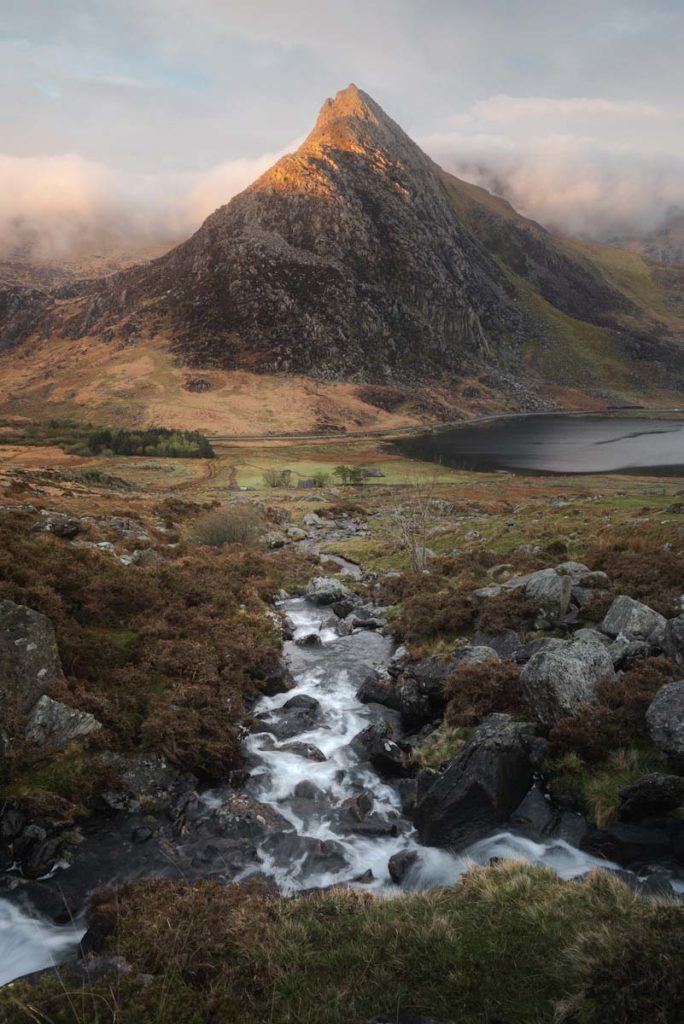
There is something to be aware of with narrow apertures called diffraction (see below explanation). You begin to lose overall sharpness in the image when you go above the apertures of F11, but you can only really notice at apertures of F18 – F22. It is often an acceptable reduction in sharpness, and you can only see it when you zoom into a photo on your PC screen. So unless you need everything to be perfectly sharp, let’s say, for a huge print, you don’t need to worry about it.
💡What is Diffraction?
When you use very narrow apertures, such as f18 or f22, the image may lose a bit of sharpness. This effect, called diffraction, happens because light bends as it passes through the small aperture opening. While this reduction in sharpness is usually minor and only noticeable when zoomed in, it’s something to keep in mind—especially for large prints or highly detailed shots.
This narrow aperture example of the Quiraing on The Isle of Skye was taken at F16. It was a fleeting moment of light as the sun rose between the horizon and the clouds, so there was no time to take multiple images. We knew we had to get everything in focus in one shot.

In this narrow aperture example, taken in Glencoe of Scotland, it was a cloudy day, and the light passed through the clouds, creating patches of bright and dark areas on the landscape we wanted to capture. Because of the short space of time, we had to capture the light. We chose an aperture of F14 and focused on the little house, which was the main subject of the photo, with the mountains behind as the secondary subject.

How to find the sharpest aperture?
All camera lenses have a sweet spot aperture value which is where they take the sharpest images possible. It typically occurs 2 – 3 stops from the widest aperture. For example, an F2.8 lens will be sharpest at F8, which is three stops.
Some people like to test their lenses to find the sharpest aperture. They do this by taking the same photo at various apertures and then analysing them on their computer screen to see which aperture yields the best results.
But if you want to know the easiest way to find out, then just google it. Someone has already done the hard work, so you don’t have to.
📸Outdoor photography comes with its own challenges!
Download our FREE photography planning guide below👇 packed with 8 simple location tips to help you capture breathtaking photos and ensure you don’t miss the golden hour!
What is the best aperture for portraits?
Using a prime lens is preferable in a portrait shoot due to the wide-open aperture values they are capable of. With this in mind, most portraits are shot at aperture values of F1.4 – F5.6. Prime lenses are also their sharpest at wide apertures, which ensures that the details of the face are clear and crisp.

The wide open aperture values create a shallow depth of field, which will make the subject stand out from the background. This will minimise distractions in the background and isolate the photo’s subject, reducing background clutter by rendering it out of focus.
Isolating a subject from the background is one thing, but portrait photographers go one step further by focusing on a model’s eyes. The eyes are the first thing people look at when looking at a face and it is preferable to isolate the eyes from the rest of the face to really catch your eye and draw attention to an image.
In portrait photography you will hear the term Bokeh often, this is just a word used to describe the soft, aesthetically pleasing background blur created when using a wide aperture. This effect can help create certain moods and atmospheres, giving the image an intimate, dreamy or cinematic feel.

Portraiture can look absolutely fantastic in natural light conditions, but it is often difficult to get enough natural light without raising ISO to undesirable levels. A wide aperture lets the maximum amount of light into the camera, which gives photographers more flexibility in low-light conditions such as cloudy days, evenings, night time or indoors.
What is the best aperture for Landscape photography?
Narrow apertures of F8 – F16 will give sharpness across a whole scene, which is essential to landscape photography. It will ensure that both the foreground and background elements are sharp and in focus, which will display intricate details across various distances.

Telephoto lenses (zoom lenses) are often used in landscape photography due to their versatility. These types of lenses start with a narrower aperture, such as F3.5, which means their sharpest aperture will sit around F8.
Every element in a landscape photo is essential and contributes to the narrative of an image. Ensuring the image is sharp throughout can help to emphasise this by detailing every layer of the image from front to back. The diffraction from a narrow aperture can be used to advantage in landscape photography by creating starburst effects from light sources such as the sun.

Landscape photography often involves standing still for an extended period, waiting for the right light conditions to fall on the photographed landscape.
A tripod can be used, which allows slow shutter speeds, which in turn means the aperture value can be higher without having to adjust the ISO.
There is a trade-off when approaching narrow apertures, such as F22, where image quality significantly decreases. This is why landscape photographers use ND (Neutral Density) filters, which make the image darker without going too high into the narrow aperture range.
Conclusion
Understanding aperture is one of the most crucial elements in improving your photography and transitioning to Manual mode with your camera. With this knowledge, you can start shooting portraits featuring beautiful, dreamy bokeh or capturing landscapes with crisp and sharp detail.
Your creative journey in photography is about to take a significant turn for the better as you begin to experiment with different aperture settings.
We encourage you to use the information you have read here to experiment with your camera. Take several photos of the same subjects at different aperture settings, and review the results on the back of your camera or, even better, on a larger screen. Try to connect the changes you make to the aperture settings with the final images you produce.
You can always return to the blog to study the various aperture examples and see how they compare to the images you’ve taken.
Now that you have gained knowledge from this blog, you can head out into the field and start exploring how aperture can bring your creative visions to life!
Would you like to connect with other photographers who share your passion?
✨ Exclusive content on finding beautiful photography locations – how to get there, the best times to visit, and what shots to capture!
✨ Tips, advice and tailored support on photography gear and techniques!
✨ Inside information on the best photo spots in specific locations to help you plan your next trip!
✨ Connecting with other Travel Photography lovers!
Tips to elevate your photography
- Mastering What Shutter Speed to Use for Perfect Shots
- Must Have Travel Photography Gear for Your Next Adventure
- How To Find Photography Spots: A Travel Photographers Guide
- When is the Best Time to Take Pictures Outside?
- Best Lens for Travel Photography: What to Pack and Why
- 17 Photography Composition Techniques for Top Travel Photos
- Understanding Aperture: Examples & Photos for Beginners
- Practical Tips to Elevate Your Photography on a Cloudy Day
- 21 Tips for Photographing Mountains
- Ultimate Guide to Perfecting Waterfall Photography
- What is Travel Photography? Start your adventure today!
- 11 Types of Travel Photography Every Traveller Should Explore
- 16 Game-Changing Tips on Travel Photography
- Beginners Guide To Photographing People While Travelling
Beautiful Photography Destinations
- Isle of Skye Photography Guide – 15 Stunning Locations
- 13 Beautiful Places for Landscape Photography in Scotland
- 10 Beautiful Places in North Wales UK for Photography
- Snowdonia Photography – 11 Breathtaking Locations
- How to Spend a Weekend in Cornwall – A 2-Day Itinerary
- Five of The Best Dorset Photography Locations
- Wachirathan Waterfall in Doi Inthanon – A Complete Guide
- How to Visit Thailand’s Sky Temple in Lampang
- Visiting Phu Chi Fa Mountains in Thailand – A Photographers Guide
- Mae Salong in North Thailand – A 2-Day Itinerary
- Mae Ya Waterfall in Doi Inthanon National Park – A Photographers Guide
- Mae Klang Waterfall in Doi Inthanon National Park – A Complete Guide
